SO TL1NBI
JAN 95
a. References: FM 100-5, Army Operations (JUN93), CGSC ST 100-9, The Tactical Decisionmaking Process (JUL93), FM 34-130, Intelligence Preparation of the Battlefield (Final Draft - July 93)
b. Prerequisite: Student must have taken Command Estimate I (IPB), and the Course of Action Development block from Command Estimate II (Defense).
2. Development.
a. Definitions:
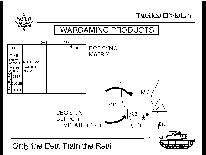
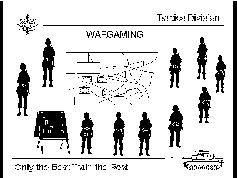
(1) Wargaming. A proactive analysis by the staff to determine the viability of friendly courses of action and probable outcome of the battle, by forcing ACTION, REACTION and COUNTERACTION.
(2) Decision Support Template (DST) - A graphic tool used to record the results of a wargaming session. Also serves as a graphic representation of the Operations Order, and a warfighting tool to assist the commander and his staff.
b. Key Players:
(1) Commander (may or may not be present - in his absence, the S3 leads the wargaming session)
(2) The Targeting Team (S3/S2/FSO)
(3) Other Primary Staff (S1/S4)
(4) ADA Liaison Officer
(5) ALO
(6) Army Aviation Liaison Officer
(7) Engineer Liaison Officer
(8) Other elements that may participate are: DS Co Cdr, CHEMO and SIGO
c. Roles of each staff element:
(1) S2 plays the enemy commander, as well as friendly S2
(2) Commander & Staff play friendly forces
(3) Each side will wargame to win the battle using correct doctrine as much as possible, and outlining realistic combat actions and Courses of Action.
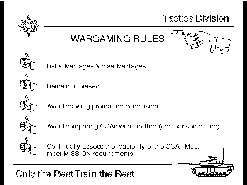
d. Wargaming Rules:
(1) List all Advantages and Disadvantages
(2) Remain unbiased
(3) Avoid drawing premature conclusions
(4) Avoid comparing COAs with one another (Comparison phase)
(5) Continually assess the feasibility of the COA. Must meet MISSION requirements
e. Wargaming Steps: Wargaming is a seven step process:
(1) STEP 1 - GATHER THE TOOLS Tools necessary for a successful wargaming session are:
(a) Enemy Situation Template(s) (enemy COAs)
(b) Friendly COAs (must include AO/AI & friendly unit disposition & strengths)
(c) Event Template (NAIs/Time Phase Lines)
(d) Critical Events list
(e) Synchronization Matrix (recording tool)
(2) STEP 2 - LIST ALL FRIENDLY FORCES
(a) Available Forces (task organization)
(b) Priority of support from higher HQ ( CAS, AI, S&R)
IF TIME IS SHORT - Consider ONLY the forces with the HIGHEST probability of influencing the outcome of the battle. This may be limited to Combat Functions.
(3) STEP 3 - ASSUMPTIONS DEVELOPED DURING MISSION ANALYSIS
Is the assumption absolutely necessary for the solution of the problem? OR Would the result change if the assumption were not made? IF NOT, the assumption is NOT necessary!
(4) STEP 4 - LIST CRITICAL EVENTS AND DECISION POINTS
(a) Critical Events - These are normally mission-essential tasks (specified or implied) or actions occurring on the battlefield which, in the judgment of the wargamer, require detailed analysis. DPs usually relate to critical events because they identify decisions that must be made to ensure timely execution/synchronization of resources to achieve the desired effects on the battlefield.
The following are some examples of critical events. This list is not all-inclusive, since these are events subjectively selected by the wargamer:
US forces in the defense:

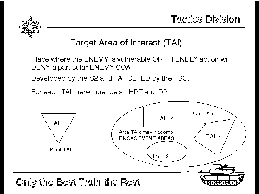
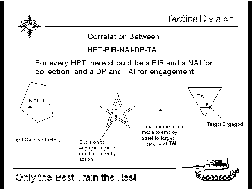
COROLLARY: For every HPT there should be a PIR and an NAI for collection and DP and a TAI for engagement.
(e) "Bootlacing" - Some of the HVTs developed by the S2 will become HPTs as the staff wargames each COA. This will derive additional PIR and NAIs for collection on those HPTs. To engage an HPT, the S2 must determine where that HPT is the most vulnerable or when the engagement of that HPT will be of the most benefit to the friendly operation. There places will become TAIs. The commander and S3, must then determine what asset will be used to engage the HPT, and when is the latest time/place where the employment of that asset will be effective against that HPT (the time and place where the commander must decide whether to use that asset). That time and place then becomes a decision point. Tying HPTs to PIR/NAIs and then to DPs and TAIs is what we call " bootlacing".
a) Avenue in Depth -
(6) STEP 6 - RECORD AND DISPLAY RESULTS
a) Narrative - This technique describes the visualization of the operation in sequence in sentence form. Provides extensive detail and clarity.
b) Sketch Note - This technique uses brief notes concerning critical locations, requirements, or task.
(7) STEP 7 - WARGAME THE BATTLE AND ASSESS THE RESULTS - Visualize the battle from initial unit locations using a logical sequence (Avenue, Belt, Box ). Wargaming sequence is ACTION - REACTION-COUNTERACTION. Conduct until critical event is successfully completed or you must employ other means to conduct the operation. The wargaming session consists of the concept that for every ACTION on the battlefield from wither side, there will be a REACTION from the opposing side, and subsequently, a COUNTERACTION. The cycle will then repeat itself with another REACTION, then COUNTERACTION, REACTION, etc., until the conclusion of the battle. The ACTION always starts with the force analyzing the battle or COA.
a) The results of a wargaming session are recorded on the synchronization matrix. The S2 plays the enemy commander, while the S3 and the rest of the staff play friendly forces. The battle is "fought" on paper hour by hour (using the H-hour sequence from the BHL in the defense or the LD/LC in the offense as a guide), analyzing each critical event to determine the viability of the courses of action, identify possible branches and sequels to the operation, and determine the approximate expected duration of combat. The entries on the synchronization matrix will synchronize critical events that should happen on the battlefield so that the desired effects of the friendly combat power are brought to bear on the enemy force at the decisive time/place.
EXAMPLE: The priority of fires will change to SEAD upon commitment of the Attack Helicopters
.... RATHER THAN- The priority of fires will change to SEAD at H+3.
In this example, the launching of the helicopters may be driven by another event which may or may not happen, or the helicopters may get delayed for some reason. In that case, firing the SEAD mission at H+3 may be useless if the helicopters are not flying at that time.
c) Results of wargaming:
1) Elimination of poor COAs
2) Recommendation of best COA to commander
3) Modifications/refinements to selected COA (main effort, task org, reserves, control measures)
4) Tasks to maneuver units
5) Tasks to support units
6) Possible branches/sequels
7) Estimated duration of the battle
8) Awareness of potential NBC effects
9) Additional critical events/PIR/HPT/NAI
10) Projection of combat losses
(8) WARGAME EXAMPLE
a) Let's look at an example of wargaming in more detail.
On the other hand, the commander might say: "I don't want my troops in MOPP IV unnecessarily; S2, can you determine with certainty when and where he will use chemical?" In the matrix we record at 20 minutes prior to the event: "ANS PIR 1." The S2 notes that PIR 1 is "When and where will the enemy use chemical?" The recorder puts DP 1 (a numbered star in the DST) and records on the M/CM/S line "DP 1 CHG MOPP IV."
The FSO says that he can limit enemy direct fire weapons with Smoke and WP. We determine that we will be within the enemy's direct fire range fan 15 minutes prior to the critical event. The S2 notes where the principle weapons systems will be and we record these as TAI 1 thru 6. This is where the FSO will shoot 15 minutes prior. On the Fire Support line the recorder notes 15 minutes prior to the critical event "SMOKE TAI 1 THRU 6." The enemy systems (HVTs) we are attacking have now become HPTs.
The FSO also notes that the lead company, Co A, our main attack, will be in the best position to direct artillery fires. So we also record "PRIORITY OF FIRES TO CO A."
We continue until we have suppressed, limited or delayed all of the enemy's reaction or as much as we can.
b) MODIFYING THE COURSE OF ACTION: If we don't reach a point where we feel we can defeat the enemy as a result of our action and counteraction, we may at this point abandon our course of action, or more likely if time is short modify it to provide more focused combat power or more combat multipliers.
c) COMPLETE THE WARGAME: Complete the wargame by gaming the remaining critical events in the same manner.
d) WARGAME AGAINST OTHER ENEMY COAs: A friendly course of action may have been created to defeat a specific enemy course of action, but in order for us to select a course of action to turn into an order it should be capable of defeating all probable enemy courses of action. To determine this we wargame all enemy courses of action against our friendly course of action. The simplest way to do this is to retain the DST we used for the first wargame and record the results of the second wargame in a different color: say black for the first wargame and blue or red for the second and third.
You will find that subsequent wargames go much faster than the first. Many actions and reactions will be the same or very similar. There will be no need to record a change since there is none. You will also find that the new enemy course of action may force the commander to make decisions: Do we send the reserve to point A or point B? Some of these will become adjustments that we make to the course of action; many others will require decisions during the battle. These will be reflected with decision points in the DST and matrix. They will result in BRANCHES.
The S2 must also remember the enemy equivalent of branches. If we neutralize, delay or limit some of the enemy's HVTs, we must remember that he has FAILURE OPTIONS. These will result in modifications to the enemy course of action even as we wargame it. For instance, the enemy might be attacking to cross the FULDA River. We identify as an HVT his GSP ferries and attack them successfully as an HPT. The S3's next critical event is our counterattack into an objective four kilometers to our side of the river. The S3 says, "Hey, we stopped him at the river; I guess that finishes this wargame." The S2 needs to respond, "No, if he doesn't make it with the GSPs, he'll bring up his bridges; it'll take him one hour to bring up the bridges and a half hour to put them in." This also generates a Branch.
e) PREPARATION: When preparing the synchronization matrix and aligning it with the time phase lines, leave one third of the space in the matrix to the side of your TPL corresponding to H hour for actions taking place prior to the start of the battle. This will allow you to conveniently record actions that must be taken prior to the beginning of the battle. The S2 and S3 must be prepared to Wargame.
f) FOCUS: Stay focused on the event not on time. Do not try to fill out what each BOS is doing at the time corresponding to a critical event. Note instead what the BOS's in use are doing at various times to have an effect at the time of the critical event.