 |
Publication Date: 16 February 1996
System Version: GCCS 2.1/Update 4
Web Page Created: 25 March 1996
Setup. To accomplish this lesson, you will need access to JOPES and the 9000 series plans with the standard JD94TNG functional permissions. You must be listed in the GNAME file as the SYNC TDBM and in the Special Access File to execute Subsystem/Function D4, Option C, and H2, Option G. The G- LINK scripts for downloading a file must be installed and operational on your terminal.
The system we use today has methods to communicate and pass information electronically. We will now look at those programs that provide us this capability.
OBJECTIVE. Given a WWMCCS environment, know how to use a teleconference to support the community of JOPES users.
Note: TM 245-91, WWMCCS Intercomputer Network (WIN) TELNET, Teleconferencing, and File Transfer Service User Guide, provides detailed information on subject applications.
TLCF Operations.
Modes. TLCF gives the user the ability to instantaneously provide information in a secure mode to interested parties. This is accomplished through the use of the four major modes of operation.
Command Mode. From this mode, other activities are selected like "Talk or Listen," DAC to another program, etc. This is where you end up if you initiate, reconvene, or join a TLCF.
Listen Mode. This mode allows passive reception of messages. This mode only recognizes a break command that puts you back into Command mode.
Talk Mode. This mode allows the user to enter messages into the system to TLCF participants.
Capabilities. TLCF has the following major capabilities:
Message entry. ($INSERT can be used to import files into the TLCF.)
Formal (public) TALK message.
"Eyes only " informal COMM message.
Message reviewing.
Notices (event messages).
Saving and printing the minutes of the conference.
Use of DAC program without leaving a conference.
Management of the conference.
Managing keywords and messages.
CAT Support. FM CAT support can range from a high of initiating and managing the TLCF to merely providing guidance to the director in regards to the teleconference.
TLCF, in many people's opinion, is by far the most used electronic communication support system. The next mainframe communications support system is the WINMAIL function.
Value Added. WINMAIL provides a quick capability to communicate with other registered users in the network environment without having to leave your terminal. This is considered an on-line capability.
Operations. WINMAIL is entered while in FTS (or in TSS for readmail only). WINMAIL allows you to do the following:
Mail file manipulation.
Deferred delivery.
Automatic acknowledgement of received mail.
Notification of mailbox status upon login to FTS.
CAT Support. As FMs, you will find that you are the first line of defense for the user. You are expected to know how to make the mail system work. What you need to know is where the system is documented and call the TDBM if it needs fixing.
Now that you have reviewed the capabilities of the electronic communications resident within TS3, you will next turn your attention to learning how to modify an OPLAN's characteristics after it has been loaded into the JOPES database.
OBJECTIVE. Given an operational JOPES environment, modify a plans' access/type and distribution.
Requirement. You currently have an OPLAN on the database that is a limited access plan resident on the primary (local) host only. Your task is to change it to a normal access plan so that the appropriate individuals will have access to it and distribute it to the backup site so that it will be on both hosts in the event one of the hosts develops problems.
Note: Navigate to the H2 screen.
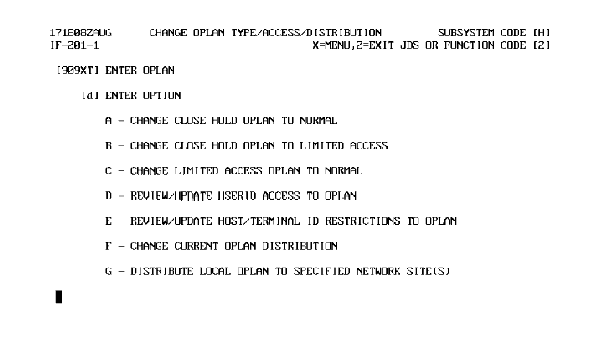
|
| CHANGE OPLAN TYPE/ACCESS/DISTRIBUTION - OPTION D | ||
|---|---|---|
| Step | Activity | Anticipated Result |
| 1 | Confirm that 909XT is in ENTER OPLAN block. If not, type "909xt". Type "d" in ENTER OPTION. <RETURN>. | IF-206, USER PERMISSIONS (Fig. 11-2), screen displays. |
 |
Delete User Access, Option B. This option allows you to delete specific users from the plan access list.
Add User Access, Option C. This option allows you to add users to the plan access list.
Add User Access From OPLAN {xxxxx}, Option D. This option allows you to copy a plan access list from one plan to another. This comes in handy if you are creating another plan and the same people are involved.
| USER PERMISSIONS | ||
|---|---|---|
| Step | Activity | Anticipated Result |
| 1 | Type "a" in ENTER OPTION. <RETURN>. | IF-202, SPECIFY USER ACCESS TO OPLAN (Fig. 11-3), screen displays. |
 |
Note: This figure shows those who currently have access to this OPLAN. You do not want to add any specific users to the plan, but you want it to become a normal access networked OPLAN. You will go back to the other options now to change your plan to normal access.
| USER PERMISSIONS | ||
|---|---|---|
| 2 | Type "2" in FUNCTION CODE. <RETURN>. | IF-201, CHANGE OPLAN TYPE/ACCESS/DISTRIBUTION (Fig. 11-1), screen redisplays. |
Change Close Hold OPLAN To Limited Access, Option B. Selecting this option changes the entered OPLAN from a close hold to limited access, allowing the plan to be networked. Again Screen IF-205 (Fig. 11-4) would follow, which allows for verification of the PID and option selected before the transaction is actually sent.
Change Limited Access OPLAN to Normal, Option C. Selecting this option changes the entered OPLAN from a limited access to a normal access, granting access to all of those individuals with that plan series permissions. You will now execute this option for the OPLAN that you are using.
| CHANGE OPLAN TYPE/ACCESS/DISTRIBUTION | ||
|---|---|---|
| Step | Activity | Anticipated Result |
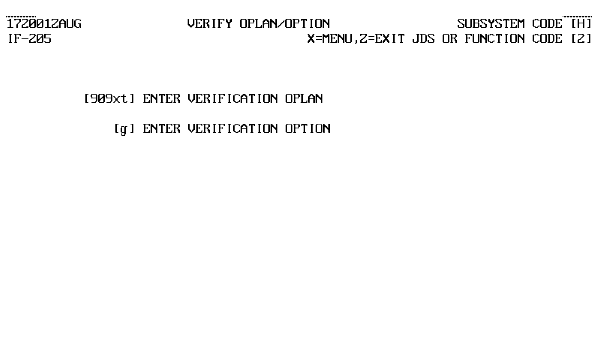
| 1 | Confirm that 909XT is in the ENTER OPLAN block. If not, type "909xt" in ENTER OPLAN and "c" in the ENTER OPTION. <RETURN>. | IF-205, VERIFY OPLAN/OPTION (Fig. 11-4), screen displays. |
 |
| CHANGE OPLAN TYPE/ACCESS/DISTRIBUTION | ||
|---|---|---|
| 2 | Type "909xt" in ENTER VERIFICATION OPLAN and "c" in ENTER VERIFICATION OPTION. <RETURN>. | IF-201, CHANGE OPLAN TYPE/ACCESS/DISTRIBUTION (Fig. 11-1), redisplays with message "TRANSACTION QUEUED, SYSTEM LOAD MAY CAUSE DELAY." |
Change Current OPLAN Distribution, Option F. This option is used to change a networked OPLAN's distribution and is restricted to the Network FM. You can review or delete a site from an OPLAN distribution list, but you cannot add a site. Sites can be added to the OPLAN routing by the Network TDBM. When deleted, transactions are no longer sent to the site specified.
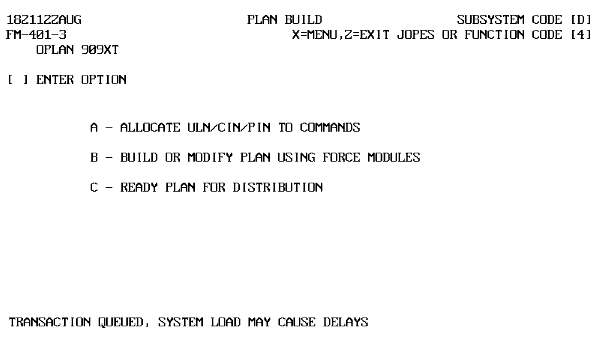
Note: Navigate to S/F D4.
| READY PLAN FOR DISTRIBUTION | ||
|---|---|---|
| Step | Activity | Anticipated Result |
| 1 | Type "c" in the ENTER OPTION. <RETURN>. | FM-401, PLAN BUILD (Fig. 11-5), displays with "TRANSACTION QUEUED, SYSTEM LOAD MAY CAUSE DELAYS" message. |
 |
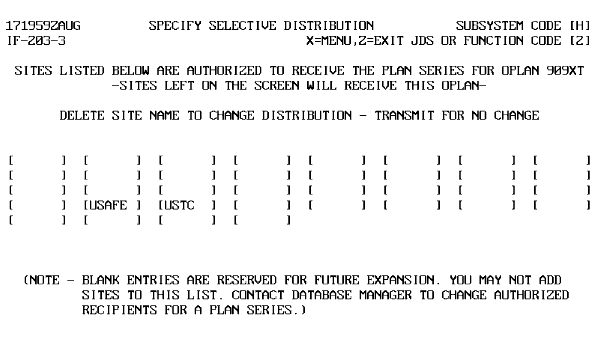
Note: Navigate to S/F H2.
| SPECIFY SELECTIVE DISTRIBUTION | ||
|---|---|---|
| Step | Activity | Anticipated Result |
| 1 | Confirm that 909XT is in the ENTER OPLAN block. If not, type "909xt" in ENTER OPLAN, "g" in ENTER OPTION, and <RETURN>. | IF-203-3, SPECIFY SELECTIVE DISTRIBUTION (Fig. 11-6), screen displays. |
 |
| SPECIFY SELECTIVE DISTRIBUTION | ||
|---|---|---|
| 2 | Blank out all sites except ANMC2 and <RETURN> | IF-205, VERIFY OPLAN/OPTION (Fig. 11-7), screen displays. |
 |
| SPECIFY SELECTIVE DISTRIBUTION | ||
|---|---|---|
| 3 | Type "909xt" in ENTER VERIFICATION OPLAN, "g" in ENTER VERIFICATION OPTION, and <RETURN>. | SPAWN BATCH JOB screen displays. |
| 4 | Type "u" in CLASSIFICATION and "j" in OUTPUT DISPOSITION. <RETURN>. | SNUMB displays. |
| 5 | Press <SPACE> <RETURN>. | IF-201, CHANGE OPLAN TYPE/ACCESS/DISTRIBUTION (Fig. 11-1), screen redisplays |
Note: Any site deleted will result in no OPLAN transactions of that plan being routed to that site.
Note: HV is where you could go to monitor the distribution of the OPLAN to the selected sites.
OBJECTIVE. Given an operational system, design a retrieval for a group of records meeting specific criteria.
Review Retrieval/Graphics Actions.
JDS F6 Report. The F6 Ad Hoc Report of JDS provides you the capability to design and print reports and graphics containing only those record fields identified. This subsystem also allows you to store and reuse the retrieval. F6 operates using the JDS active database and consists of a three step process.
Note: In data selection, it is important to note that once these records are extracted, other records cannot be looked at unless the data selection phase is repeated.
Output Selection. Once the exact data you wish to view has been selected, the final step, output selection, is entered. During this step, you will identify elements to appear, select a format for the report, and a location for it to be sent.
F6 has over 20 different output formats. As a quick introduction, you will review some of those used most often. They will be discussed in more detail later.
Hard Copy. Sends reports to the printer.
ASCII Files. This file may then be posted to a personal workstation and input into a commercial software package.
QRFs AND USFs. QRFs and USFs are special files created by the user.
A USF is a file that stores the format you have selected.
Force Modules. F6 also provides the ability to retrieve requirements from the database and place them in a force module. You would then be able to track the FM through its deployment using any of the appropriate subsystem/function codes that have already been discussed.
Now that you have had a quick review of the capabilities of F6, it is time to execute a retrieval.
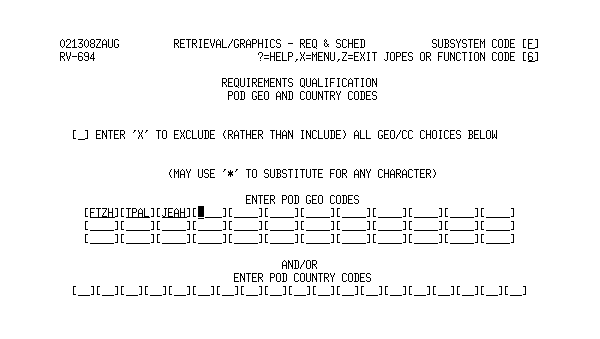
Requirement. There have been several questions regarding the port capabilities of some of the planned PODs in your OPLAN. The CAT Chief has requested a report displaying the Army and Air Force units planned to be flown by AMC to the PODs of El Borma (GEOCODE FTZH), Tozeur (GEOCODE TPAL), and Jerba (GEOCODE JEAH) within the first ten days of this OPLAN. Sort the report by LAD and Service, include: ULNs, Unit Names, Bulk STONS, PAX, and POD.
 |
| PRODUCE AN F6 RETRIEVAL | ||
|---|---|---|
| Step | Activity | Anticipated Result |
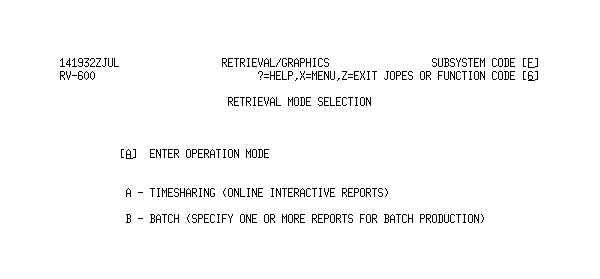
| 1 | On Retrieval Mode Selection, type "a" in ENTER OPERATION MODE, press <RETURN>. | RV-601, DATA SELECTION MAIN MENU (Fig. 11-9), displays. |
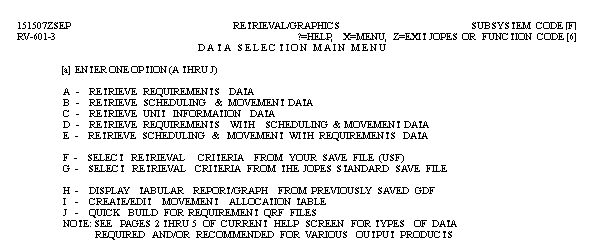 |
Option "B" is not applicable because TS3 does not contain S&M data.
Option "C" retrieves data about specific units. It may include SORTS and TUCHA data.
Options "D" and "E" are no longer applicable because TS3 does not use the S&M data.
Option "F" will use the criteria from a previously saved USF to retrieve data during the data selection phase.
Option "G" is not applicable. JOPES Standard Save Files are no longer available.
Option "I" creates, edits, or reviews a Movement Allocation Table. Movement Allocation Tables are user created data tables to assist in planning and defining a graphic product.
Option "J" permits rapid build of a QRF database using up to 15 OPLANs.
| PRODUCE AN F6 RETRIEVAL | ||
|---|---|---|
| 2 | Type "a" at ENTER ONE OPTION (A THRU J), press <RETURN>. | RV-602, DATA SOURCES SELECTION (Fig. 11-10), screen displays. |
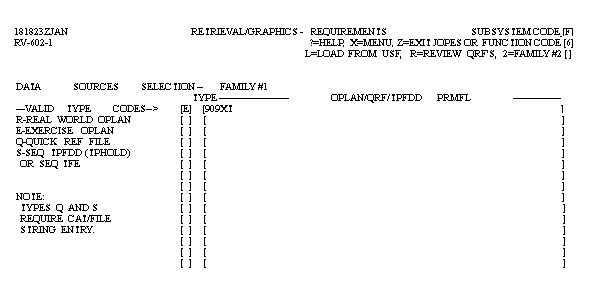 |
Note: A family is a method of comparing two sets of data such as OPLANs, FMs, etc. It is a grouping of up to 15 sources. A family does not have to be related in any way, but could represent a deployment scenario. Loading plans to two families facilitates comparison of two scenarios. You may select OPLANs from both exercise and real world for a family. An OPLAN family can run the gamut from those in support of a geographic region to a general war plan. In F6, OPLAN families are determined solely by entries on this screen.
| PRODUCE AN F6 RETRIEVAL | ||
|---|---|---|
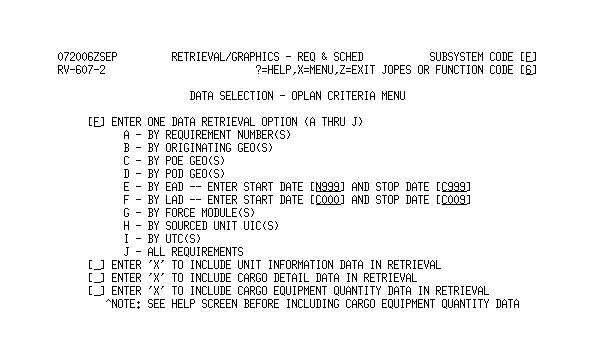
| 3 | Type or verify that there is an "e" in TYPE and 909XT in OPLAN/QRF/TPFDD PRMFL, press <RETURN>. | RV-607, DATA SELECTION - OPLAN CRITERIA MENU (Fig. 11-11), displays. |
 |
| PRODUCE AN F6 RETRIEVAL | ||
|---|---|---|
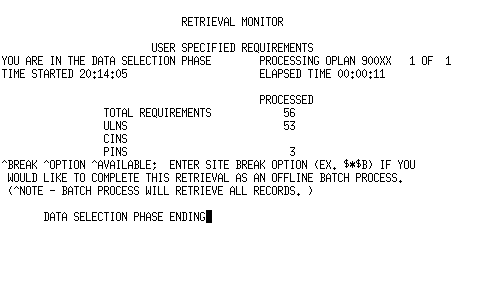
| 4 | Type "f" in ENTER ONE DATA RETRIEVAL OPTION (A THRU J), type "c000" in by LAD -- ENTER START DATE, type "c009" in STOP DATE, press <RETURN>. | RETRIEVAL MONITOR (Fig. 11-12) screen displays. |
Note: Selects data to be retrieved by LAD based on the C-Days specified. Display of the Retrieval Monitor screen may be very brief with the Data Qualification (Fig. 11-13) screen displaying without entry.
 |
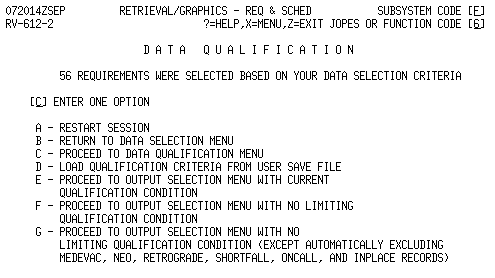 |
Option "B" returns you to the Data Selection Main Menu (Fig. 11-9) to make another choice in selecting data.
Option "C" takes you to the appropriate data qualification menu depending on whether you want to qualify requirements or unit information data.
Option "D" takes you to the Load from User Save File screen where you select a USF to use for the retrieval.
Options "E", "F", and "G" take you to the Output Selection Menu screen (Fig. 11-19). Option "E" will use existing qualification criteria for the retrieval. If no qualification criteria exists, it will automatically exclude medevac, NEO, retrograde, shortfall, oncall, and inplace records just like Option "G." Option "F" will use no qualification criteria.
| PRODUCE AN F6 RETRIEVAL | ||
|---|---|---|
| 5 | Type "c" for PROCEED TO DATA QUALIFICATION MENU, press <RETURN>. | RV-641, REQUIREMENTS QUICK QUALIFICATION (Fig. 11-14), screen displays. |
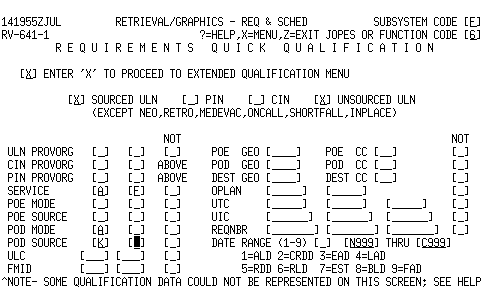 |
The requirement outlined makes it necessary to further qualify your data. Only one POD can be entered on this screen. To further qualify your data, or enter more than one POD, you must place an "X" in the block labeled "Enter 'X' to Proceed to Extended Qualification Menu," so additional screens would post.
An "N" in Service and an "X" in the Not column retrieves all records other than Navy.
| PRODUCE AN F6 RETRIEVAL | ||
|---|---|---|
| 6 | Ensure there is an "x" in ENTER 'X' TO PROCEED TO EXTENDED QUALIFICATION MENU. | |
| 7 | Blank out the "x" in the PIN and CIN fields. | |
| 8 | Type "a" and "f" in SERVICE, type "a" in POD MODE, type "k" in POD SOURCE, press <RETURN>. | RV-614, REQUIREMENTS DATA QUALIFICATION MENU (PAGE 1 OF 4) (Fig. 11-15), screen displays. |
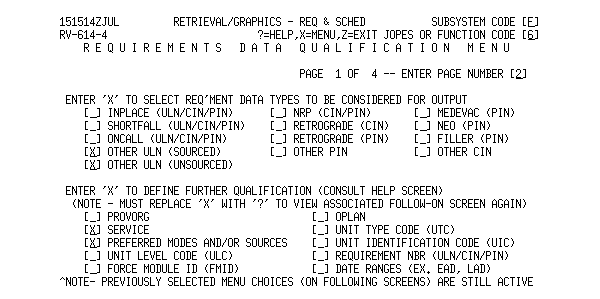 |
The lower half of the screen allows you to request further qualification screens by placing an "X" opposite those fields.
| PRODUCE AN F6 RETRIEVAL | ||
|---|---|---|
| 9 | Type "2" at ENTER PAGE NUMBER, press <RETURN>. | RV-614, REQUIREMENTS DATA QUALIFICATION (PAGE 2 OF 4) (Fig. 11-16), screen displays. |
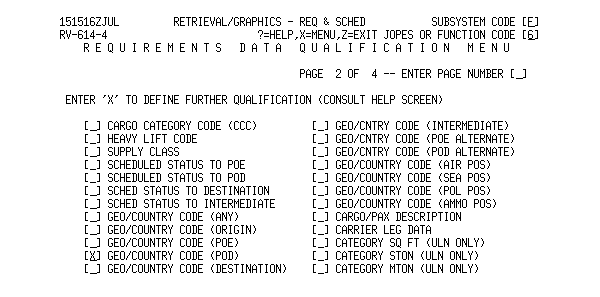 |
| PRODUCE AN F6 RETRIEVAL | ||
|---|---|---|
| 10 | Type "x" at GEO/COUNTRY CODE (POD), press <RETURN>. | RV-694, REQUIREMENTS QUALIFICATION POD GEO AND COUNTRY CODES (Fig. 11-17), screen displays. |
 |
| PRODUCE AN F6 RETRIEVAL | ||
|---|---|---|
| 11 | Type "ftzh", "tpal", and "jeah" in ENTER POD GEO CODES, press <RETURN>. | RV-SUM, QUALIFICATION CRITERIA SUMMARY (Fig. 11-18), screen displays. |
 |
Help explains the remaining command line options.
TP takes you to the next page.
Restart returns you to Data Qualification (Fig. 11-13) to restart qualification selection.
Append displays the System Qualification Menu.
Load displays the Load From User Save File.
Delete NN deletes a numbered set, then redisplays this screen with the renumbered sets.
Change NN redisplays the first qualification screen for the set being changed. Upon summary redisplay, the system renumbers the changed condition and appends to the summary at the end.
| PRODUCE AN F6 RETRIEVAL | ||
|---|---|---|
| 12 | After review, press <SPACE> <RETURN>. | RV-626, OUTPUT SELECTION MENU (PART 1 OF 3) (Fig. 11-19), screen displays. |
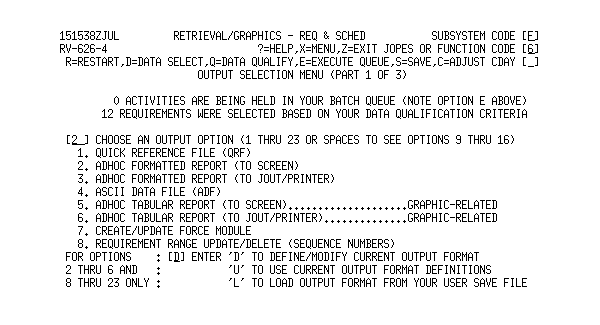 |
The options available for use in the bracket below Subsystem and Function Code are:
"D" = Data Select (Data Selection Main Menu). Allows you to reselect data. (Fig. 11-9).
"Q" = Data Qualify (Data Qualification). Allows you to requalify the retrieval data. (Fig. 11-13).
"E" = Execute Queue (Retrieval Print and Remote Spawn Option). Used if any activities (reports, graphs, etc.) are in the queue.
"S" = Save (User Save File Update). Allows you to save your format in USF.
"C" = Adjust C-Day (Relative C-Day Specification). This option no longer applies.
As mentioned before, there are 23 different output selections grouped into five types of media.
Option "4" allows the saving of an ASCII Data File. ASCII stands for the American Standard for Computer Information Interchange and serves as a standard for communication between computers. ASCII files provide a generic, but limited, communication tool for computer software. As you may be aware, many commercial off-the-shelf software packages such as WordPerfect, WINGZ, and Harvard Graphics use ASCII files to communicate. For example, you could develop a tabular report to provide raw data on port work load requirements versus throughput capabilities. Download it as an ASCII data file via this option, then upload into Harvard Graphics to draw/display graphs for briefings, etc.
Another important feature found on the Output Selection Menu screen is Option "7" - Create/Update Force Module.
Several options ("12," "13," "20," & "21") allow the storage of GDFs or Graphic Display Files. These files are used to store graphic data in much the same way as a QRF stores alphanumeric data. Keep in mind that special equipment may be required to display graphics on your terminal.
If you need a hard copy, use options "3," "6," "9," "11," "17," or "19." Selection of any of these options sends the product to the F6 Batch Queue for holding. The "execute" command on the Output Selection Menu screen allows you to set up the output on the Spawn Batch Job screen and produce the required product.
The remaining options send the report to the screen.
Note: Equipment Count applies to Army equipment only since the Army is the only service that consistently uses the equipment identification code (EIC). This function reads the first six characters of the EIC of Level 4 cargo data records and, if those six characters match the code for a piece of equipment as requested in any of the column definitions, then the count for that column will be incremented. The report generated displays counts of types of equipment associated with the retrieved data. Equipment count is the only F6 function that expresses type of equipment by quantity. You must have previously selected Level 4 Cargo Equipment Quantity Data on the Data Selection - OPLAN Criteria Menu screen to select output options 16, 17, 20, or 22. Unit Count allows you to receive a count of the number of impacted units in a selected category in an OPLAN or OPLAN family. The unit count adds dual-tasked units only once, and the system counts each unsourced UIC as a unique unit. However, the system disregards split-shipment cargo. Unit count applies to ULNs only. The Additional Column Values Screen allows you to select up to ten unit type combinations for retrieval. On the Output Selection Menu, choose options 18, 19, 21, or 23 for a unit count tabular report, graphic data file, or an online graph.
| PRODUCE AN F6 RETRIEVAL | ||
|---|---|---|
| 13 | Type "2" in CHOOSE AN OUTPUT OPTION, press <RETURN>. | RV-628, OUTPUT FORMAT SPECIFICATION - TITLE SELECTION (Fig. 11-20), screen displays. |
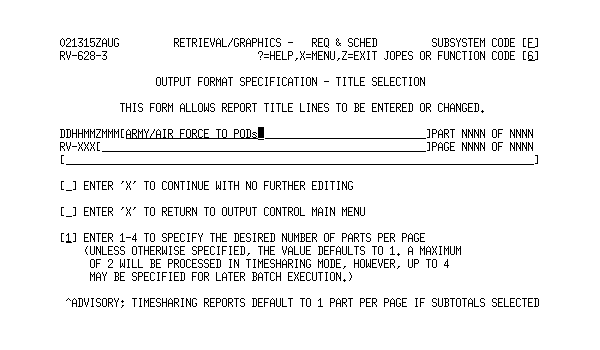 |
The last block allows you to determine the number of parts per page you want for your retrieval/report. You cannot exceed two parts if in timesharing; four parts in batch. If you select subtotals, the timesharing retrieval will always default to one, no matter what you select.
| PRODUCE AN F6 RETRIEVAL | ||
|---|---|---|
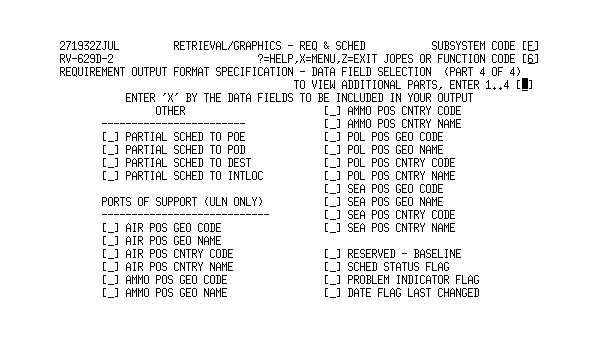
| 14 | Enter the name of your report, and press <RETURN>. | RV-629A, REQUIREMENT OUTPUT FORMAT SPECIFICATION - DATA FIELD SELECTION (PART 1 OF 4) (Fig. 11-21), screen displays. |
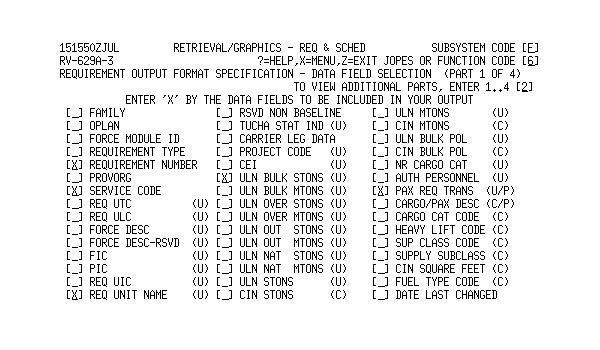 |
Requirement Output Format Specification - Data Field Selection (Part 1 of 4).
Some data elements may be identified differently, therefore, they may not be familiar to you.
Page through all four of these screens to view various options. Output selections are not required on all four screens.
You can return to any part of the Requirement Output Format Specification - Data Field Selection screens by entering the appropriate part number. When you are satisfied with your selections, leave the Part field blank and press <RETURN>.
| PRODUCE AN F6 RETRIEVAL | ||
|---|---|---|
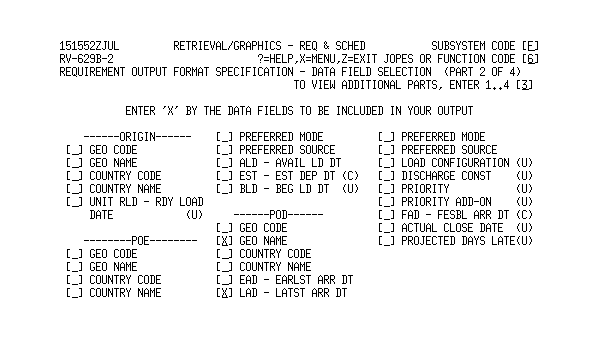
| 15 | Type "2" in TO VIEW ADDITIONAL PARTS, ENTER (1..4), type "x" in REQUIREMENT NUMBER, SERVICE CODE, REQ UNIT NAME, ULN BULK STONS, and PAX REQ TRANS, press <RETURN>. | RV-629B, REQUIREMENT OUTPUT FORMAT SPECIFICATION - DATA FIELD SELECTION (PART 2 OF 4) (Fig. 11-22), screen displays. |
 |
| PRODUCE AN F6 RETRIEVAL | ||
|---|---|---|
| 16 | Type "3" in TO VIEW ADDITIONAL PARTS, type "x" in (POD) GEO NAME, (POD) LAD - LATST ARR DT, press <RETURN>. | RV-629C, REQUIREMENT OUTPUT FORMAT SPECIFICATION - DATA FIELD SELECTION (PART 3 OF 4) (Fig. 11-23), screen displays. |
 |
| PRODUCE AN F6 RETRIEVAL | ||
|---|---|---|
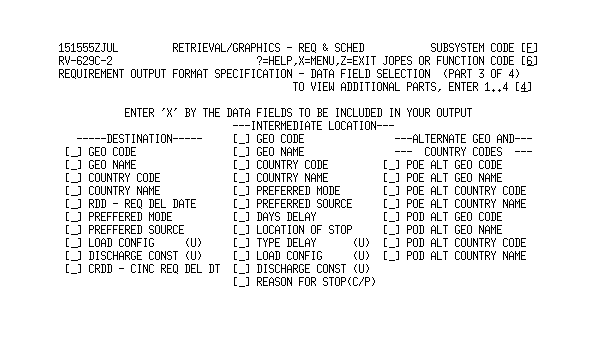
| 17 | Type "4" in TO VIEW ADDITIONAL PARTS, press <RETURN>. | RV-629D, REQUIREMENT OUTPUT FORMAT SPECIFICATION - DATA FIELD SELECTION (PART 4 OF 4) (Fig. 11-24), screen displays. |
 |
| PRODUCE AN F6 RETRIEVAL | ||
|---|---|---|
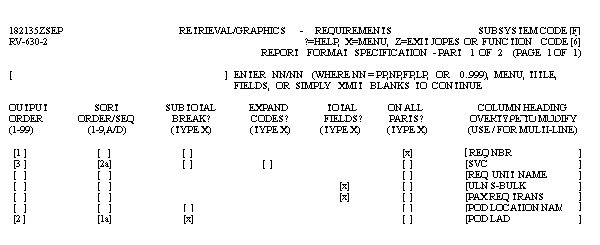
| 18 | Press <RETURN>. | RV-630, REPORT FORMAT SPECIFICATION (PART 1 OF 2) (Fig. 11-25), screen displays. |
 |
| PRODUCE AN F6 RETRIEVAL | ||
|---|---|---|
| 19 | Press <RETURN>. | RV-631, AD HOC FORMATTED REPORT (Fig. 11-26), screen displays. |
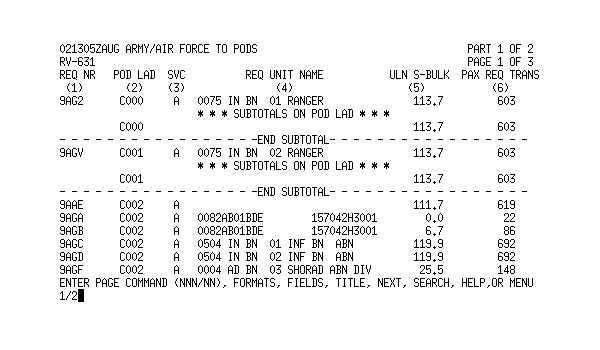 |
To display a part, use the Page command (nnn/nn). The first set of numbers represents the desired page number, and the numbers on the right represent the part number, i.e., the command "Page 45/2" would display part 2 of page 45.
| PRODUCE AN F6 RETRIEVAL | ||
|---|---|---|
| 20 | Type "1/2" to view the first page of Part 2, press <RETURN>. | Part 2 displays. |
"Fields" or "FI" will return you to the screen (either of three Format Specification screens) where you defined the fields. If you selected a screen report, you are looking at your report.
"Title" or "TI" returns you to the title selection screen.
"Next", "NP", or pressing <SPACE> <RETURN> will take you to the next page.
"Search" or "SE" looks for specific items within the report. Search 1 XXXXX (where ULNs are the first column) will locate the page where that specific ULN first appears.
"Help" or "HE" brings up the help screens. These help screens explain the various paging commands and options, including the search feature.
"Menu" or "ME" returns you to the Output Selection Menu (Part 1 of 3) where you began defining your output format.
Return to Output Selection Menu. The Output Selection Menu is the screen where you can design how your report looks.
| PRODUCE AN F6 RETRIEVAL | ||
|---|---|---|
| 21 | Type "fo" on the Command Line, press <RETURN>. | RV-630, REPORT FORMAT SPECIFICATION (PART 1 OF 2) (Fig. 11-25), screen redisplays. |
Sort Order/Seq determines the priority and method for sorting those records included in the report. 1A is the primary sort with the A indicating ascending order; 2A depicts a secondary sort in ascending order. The requirement was to have the report in LAD/Service sort in ascending (i.e., C000 to C009) order.
Subtotal Break is used to include subtotals after a particular set of records and ignore subtotals unless the totals are requested. For example, subtotal breaks may be used to post subtotals for a particular day or a particular location. Subtotal breaks are not allowed unless a "Sort Order/Seq" is specified.
Expand Codes will print the expanded code for those areas marked.
Total Fields will total the requested items at the end of the report.
On All Parts places the field indicated as the first field on all parts of the report. It is a good idea to check this block (for the ULN field) in case your report runs into multiple parts. Usually the ULN field is selected because it is a unique identifier.
Column Heading will overwrite the existing field title with a new column heading if desired. Change these to headings you are more familiar with, e.g., change Req Nr to ULN.
Review Part 2 of this screen.
| PRODUCE AN F6 RETRIEVAL | ||
|---|---|---|
| 22 | Type "1/2" in ENTER NN/NN to go to Part 2 of Output Format, press <RETURN>. | RV-630, REPORT FORMAT SPECIFICATION (PART 2 OF 2), screen displays. |
The width of your display is a function of the width of the column headings and the width of the data fields themselves. If you title the Req Nr field "Requirement Number," the system reserves 18 spaces for that column even though the field itself is only seven characters wide. You can also use a "/" to create a multi- line heading.
Spend some time using Parts 1 and 2 of Output Format to design your retrieval to your satisfaction. A good exercise is to try to reduce it to one page and one part. When finished, return to the Output Selection Menu.
| PRODUCE AN F6 RETRIEVAL | ||
|---|---|---|
| 23 | Type "menu" on the Command Line, press <RETURN>. | RV-626, OUTPUT SELECTION MENU (PART 1 OF 3) (Fig. 11-19), screen redisplays. |
Note: You may now exit F6 back to the JOPES Master Menu.
OBJECTIVE. Without references, identify, in specific terms, the method used to export a JOPES OPLAN to a floppy disk.
DPS 8000 Sequential Permfile to PC Hard Drive. Use the G-LINK software to transfer a copy of the TPFDD file from the mainframe to the hard drive of your PC workstation.
PC Hard Drive to Disk/Tape. Use DOS commands to copy the TPFDD from your workstation hard drive to a 3 1/2 inch floppy disk or an 8mm tape.
Sneaker Net. Hand carry the 3 1/2 inch floppy disk or 8mm tape to a GCCS/JOPES terminal.
Disk/Tape to a GCCS Terminal/Server Hard Drive. If it is a 3 1/2 inch floppy disk, upload the TPFDD to your user storage area. If it is an 8mm tape, proceed to the next step.
GCCS Terminal/Server Hard Drive to GCCS JOPES Database. Use the System Services software to transfer a copy of the TPFDD into the GCCS/JOPES database.
Demonstration.
Requirement. You have been notified that your OPLAN has been downgraded to Secret and that execution is pending a National Command Authority decision. You have been directed to upload a copy of the TPFDD into the GCCS/JOPES database.
| AIR GAP PROCEDURES | ||
|---|---|---|
| Step | Activity | Anticipated Result |
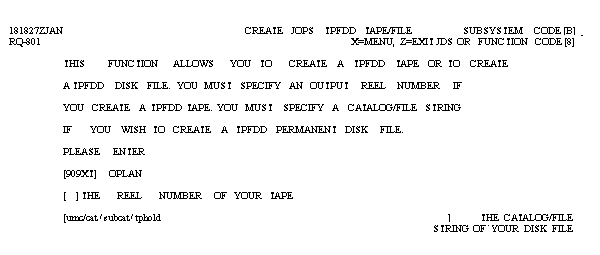
| 1 | At JOPES MASTER MENU, type "b8" in SUBSYSTEM AND FUNCTION CODE, "909xt" in OPLAN, "e" in DATABASE, press <RETURN>. | RQ-801, CREATE JOPS TPFDD TAPE/FILE (Fig. 11-27), screen displays. |
 |
| AIR GAP PROCEDURES | ||
|---|---|---|
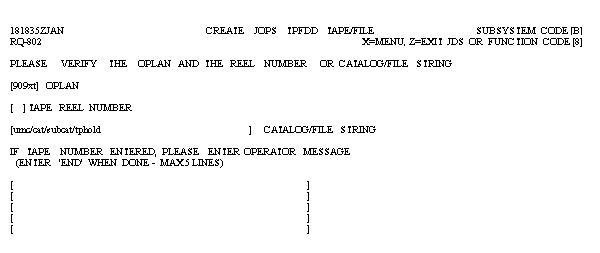
| 2 | Type "909xt" in OPLAN, {umc/cat/subcat/tphold} in THE CATALOG/FILE STRING, press <RETURN>. | RQ-802, CREATE JOPS TPFDD TAPE/FILE (Fig. 11-28), screen displays. |
 |
| AIR GAP PROCEDURES | ||
|---|---|---|
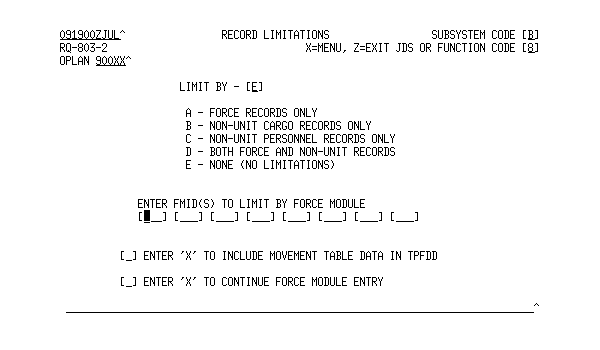
| 3 | Type "909xt" in OPLAN, {umc/cat/subcat/tphold} in CATALOG/FILE STRING, press <RETURN>. | RQ-803, RECORD LIMITATIONS (Fig. 11-29), screen displays. |
 |
| AIR GAP PROCEDURES | ||
|---|---|---|
| 4 | Type "e" in LIMIT BY, press <RETURN>. | UF-001, SPAWN BATCH JOB, screen displays. |
| 5 | Type "u" for UNCLASSIFIED, "j" for JOUT, press <RETURN>. | The system then provides a SNUMB. |
| 6 | <SPACE><RETURN>. | RQ-801, CREATE JOPS TPFDD TAPE/FILE (Fig. 11-27), screen redisplays. |
| AIR GAP PROCEDURES | ||
|---|---|---|
| 7 | Type "z" in the function field and press <RETURN>. | JOPES is exited and the timeshare prompt (*) displays. |
Note: During the following G-LINK file transfer process, several delays will be experienced. All delays that can take more than 60 seconds are noted on the screen and that amount of time must be allowed before assuming that something is wrong. The user must allow the noted amount of time for the long delays and at least 60 seconds for each short delay as premature script termination leaves various components of the TS3 network in undefined states.
| AIR GAP PROCEDURES | ||
|---|---|---|
| 8 | At the Timeshare prompt, Press <Alt-2>. | The KERMIT Menu (Fig. 11-30) screen displays. |
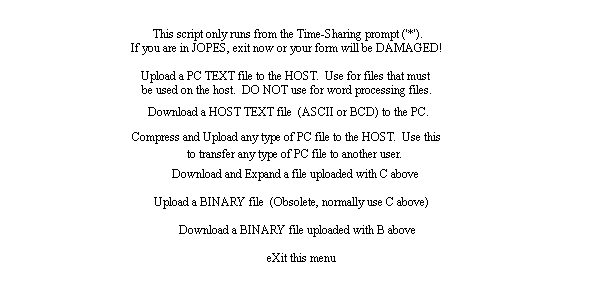 |
The six options immediately below the warning provide the capability to upload or download files in either text or binary format. If the file to be downloaded is in any WWMCCS standard text format (ASCII, BCD, CARD, etc.), then use the text file option. If the file is in binary format (previously uploaded using Option B), use the binary Option I. If the file was uploaded using Option C, then use Option E.
Note: If Option D is used, then the KERMIT G-LINK script will automatically convert the file to ASCII format prior to the actual transfer. If the file needs to be maintained as a binary file, then it should be copied first and the copy uploaded to the host.
| AIR GAP PROCEDURES | ||
|---|---|---|
| 9 | Type "d" to select the Download a HOST TEXT file to the PC option. | The KERMIT Menu (Fig. 11-30) screen with the filename prompt appears. |
Note: The G-LINK script expects all file transfers to be between the full Cat/file string on the host and the C:\XFERS DOS directory on your workstation. The name of the file transferred to your \XFERS directory will be the same as the file name on the mainframe.
| AIR GAP PROCEDURES | ||
|---|---|---|
| 10 | Type {umc/cat/subcat/filename} and press <RETURN>. | Progress messages will display until you are prompted by the "Please press a key to continue". |
| 11 | Press <a> key. | System returns to the Timeshare (*) prompt. |
Note: If a premature script termination occurs, then you should run the LOGON.SCR script to attempt to correct the problem (may require multiple runs). Once back on the host, if the host KERMIT program is still running, pressing <Alt-B> will often terminate that program and allow you to continue your operations.
| AIR GAP PROCEDURES | ||
|---|---|---|
| 12 | At the Timeshare prompt, press <Alt-D>. | Terminal exits to the DOS prompt. |
| 13 | Insert a floppy disk into the drive and at the DOS prompt, type "copy \xfers\{filename} {drive}:" and press <ENTER>. | Your TPFDD is copied from your hard drive to your floppy disk. |
| 14 | At the DOS prompt, type "exit". | Terminal returns to the G-LINK Time share prompt. |
Summary. The overall focus of this lesson was on how you may be called on to use the TS3 software to support activities in some type of a crisis. You should now be familiar with the system TLCF capabilities, how to modify an OPLAN's characteristics to make it accessible by the appropriate users, and how to network it to the backup host. You also covered how to extract information concerning specific records from the database and display that data in a report on your screen. In addition, you are able to make a copy of your TPFDD and store it on a floppy disk.